一个配置管理系统(configuration management system),当下最流行的批量自动化运维工具之一。
常用的运维工具:
ssh/puppet(ruby)/ansible(无客户端,中小规模)(python)/saltstack(master-minion)(python)大规模。
Ansible的作用:
批量部署,服务安装,日常备份。
Ansible官方文档:
https://docs.ansible.com/ansible/latest/index.html
Ansible的特性:
无客户端软件,通过ssh远程管理
安装后不需要启动服务
依赖大量的Python模块扩展功能
配置文件:/etc/ansible/ansible.cfg
Ansible基础架构:
连接插件(connecter plugins):用来连接主机,连接被管理端
核心模块(core modules):连接主机,实现操作,依赖于具体模块来执行
自定义模块:用户自己开发的功能模块
剧本(playbook):将多个任务组合成一个剧本,由ansible自动批量执行
主机清单(host inventory):定义ansible管理的客户端主机范围
Ansible的命令格式:
ansible 主机清单名 -m 调用的模块 -a 动作命令
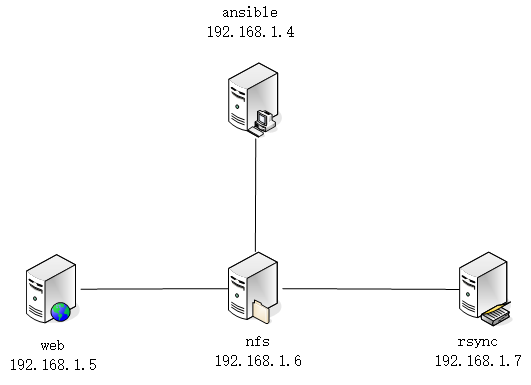
实验环境:打开四台Centos7,根据拓扑图修改IP、修改主机名。
拓扑图如下:
1. 先配epel源:
epel源(扩展包):wget -O /etc/yum.repos.d/epel.repo http://mirrors.leiyu.cn/repo/epel-7.repo
linux镜像源(组包):wget -O /etc/yum.repos.d/CentOS-Base.repo http://mirrors.leiyu.cn/repo/Centos-7.repo
2. 安装ansible
[root@ansible ~]# yum -y install ansible
查看版本

1. 修改配置hosts文件
1. [root@ansible ~]# vim /etc/hosts 2. 192.168.1.4 ansible 3. 192.168.1.5 web 4. 192.168.1.6 nfs 5. 192.168.1.7 rsync
2. 编辑清单
1. [root@ansible ~]# vim /etc/ansible/hosts 2. 添加: 3. [web] 4. 192.168.1.5 5. [nfs] 6. 192.168.1.6 7. [rsync] 8. 192.168.1.7 9. [benet:children] //组内成员 10. web 11. nfs 12. rsync
ansible服务器配置密钥对访问。
1. [root@ansible ~]# ssh-keygen -t rsa //执行后按三次回车键 2. [root@ansible ~]# ssh-copy-id root@192.168.1.5 3. [root@ansible ~]# ssh-copy-id root@192.168.1.6 4. [root@ansible ~]# ssh-copy-id root@192.168.1.7
调用模块颜色显示:
黄色 更改成功
绿色 没有更改
红色 错误
紫色 警告
列出所有模块
[root@ansible ~]# ansible-doc --list
查看ansible模块帮助
[root@ansible ~]# ansible-doc yum
仅支持简单语法命令,但语句中不能包含管道符等复杂元素。
1. ansible查看web主机的主机名称
1. [root@ansible ~]# ansible web -m command -a "hostname" 2. 3. 192.168.1.5 | CHANGED | rc=0 >> 4. 5. web
2. ansible创建web主机用户zhangsan
1. [root@ansible ~]# ansible web -m command -a "useradd zhangsan" 2. 3. 192.168.1.5 | CHANGED | rc=0 >>
查看已创建用户zhangsan

command的升级版,支持复杂语句,但不支持别名。正常情况下使用shell就可以了,command可以忽略,了解就行。
1. [root@ansible ~]# ansible web -m shell -a "echo 123 |passwd --stdin zhangsan" 2. 3. 192.168.1.5 | CHANGED | rc=0 >> 4. 5. 更改用户 zhangsan 的密码 。 6. 7. passwd:所有的身份验证令牌已经成功更新。
web主机yum安装nginx服务。
[root@ansible ~]# ansible web -m yum -a "name=nginx state=installed"
注释:
name 安装的软件包名
state 服务状态
installed,present 安装软件包
removed,absent 卸载软件包
latest 安装最新软件包
复制ansible本地hosts文件到benet组的所有主机。
[root@ansible ~]# ansible benet -m copy -a "src=/etc/hosts dest=/etc/hosts backup=yes"
注释:
src 源文件路径
dest 目标文件路径
backup 覆盖到目标文件前,是否提前备份
content 添加文件内容
group 指定属组
owner 指定属主
mode 指定权限
关闭web主机的nginx服务,实现开机自启。service/systemd两种方法都可以,个人推荐systemd。
[root@ansible ~]# ansible web -m service -a "name=nginx state=stopped enabled=yes"
注释:
name 指定服务名
state 指定服务运行状态
started 开启服务
stopped 关闭服务
reloaded 重载服务
restarted 重启服务
enabled 是否开机自启
1. 在所有清单主机上创建组www,gid 666
[root@ansible ~]# ansible all -m group -a "name=www gid=666"
2. 在所有清单主机删除组www
[root@ansible ~]# ansible all -m group -a "name=www gid=666 state=absent"
1. 所有主机创建用户zhangsan
[root@ansible ~]# ansible all -m user -a "name=zhangsan"
2. 给web主机的zhangsan用户设置密码
1. [root@ansible ~]# ansible web -m shell -a "echo 123 |passwd --stdin zhangsan" 2. 3. 192.168.1.5 | CHANGED | rc=0 >> 4. 5. 更改用户 zhangsan 的密码 。 6. 7. passwd:所有的身份验证令牌已经成功更新。
1. 创建backup目录,并赋权,更改属主属组
[root@ansible ~]# ansible rsync -m file -a "path=/backup owner=root group=root recurse=yes mode=777"
recurse=yes 时表示可以递归地修改目录中文件的属性。
2. 创建test.txt文件,file模块可以创建目录又能创建文件
[root@ansible ~]# ansible rsync -m file -a "path=/test.txt owner=root group=root state=touch mode=777"
在ansible上远程配置rsync服务
1. 修改rsync配置文件,并传到rsync服务器
1. [root@ansible ~]# mkdir /etc/ansible/conf 2. [root@ansible ~]# cd /etc/ansible/conf 3. [root@ansible conf]# cp /etc/rsyncd.conf ./ 4. [root@ansible conf]# vim rsyncd.conf 5. uid = root 6. gid = root 7. port 873 8. address = 192.168.1.7 9. hosts allow = 192.168.1.0/24 10. max connections = 4 11. pid file = /var/run/rsyncd.pid 12. timeout = 900 13. dont compress = *.gz *.tgz *.zip *.z *.Z *.rpm *.deb *.bz2 14. [backup] 15. path = /backup 16. read only = no 17. auth users = rsync_backup 18. secrets file = /etc/rsync.password 19. [root@ansible conf]# ansible rsync -m copy -a "src=rsyncd.conf dest=/etc/rsyncd.conf backup=yes"
2. 启动rsync服务
[root@ansible conf]# ansible rsync -m systemd -a "name=rsyncd state=restarted"
3. 创建目录,并赋权,更改属主属组
[root@ansible conf]# ansible rsync -m file -a "path=/backup owner=root group=root recurse=yes mode=777"
4. 配置rsync服务器的密码文件:
1. [root@ansible conf]# ansible rsync -m copy -a "content='rsync_backup:1' dest=/etc/rsync.password owner=root group=root mode=600" 2. 验证文件 3. [root@ansible conf]# ansible rsync -m shell -a "ls -l /etc/rsync.password" 4. 192.168.1.7 | CHANGED | rc=0 >> 5. -rw------- 1 root root 14 11月 16 18:38 /etc/rsync.password 6. [root@ansible conf]# ansible rsync -m shell -a "cat /etc/rsync.password" 7. 192.168.1.7 | CHANGED | rc=0 >> 8. rsync_backup:1
5. 配置所有服务器的rsync连接密码文件
[root@ansible conf]# ansible benet -m copy -a "content='1' dest=/etc/server.pass owner=root group=root mode=600"
6. 测试:备份WEB的httpd.conf配置文件
[root@ansible conf]# ansible web -m shell -a "rsync -avz --password-file=/etc/server.pass /etc/nginx/nginx.conf rsync_backup@rsync::backup"
挂载模块,详情请看下面案例。
[root@ansible ~]# ansible web -m mount -a "src=nfs:/nfs path=/usr/share/nginx/html fstype=nfs state=mounted"
注释:
state 挂载状态
mounted 挂载
unmounted 卸载
在ansible上远程部署nfs并远程挂载。
1. [root@ansible ~]# ansible nfs -m file -a "path=/nfs owner=root group=root recurse=yes mode=777" 2. [root@ansible ~]# vim /etc/exports 3. /nfs 192.168.1.0/24(rw,sync,no_root_squash) 4. [root@ansible ~]# ansible nfs -m copy -a "src=/etc/exports dest=/etc/exports" 5. [root@ansible ~]# ansible nfs -m systemd -a "name=nfs state=restarted" 6. [root@ansible ~]# ansible nfs -m systemd -a "name=rpcbind state=restarted"
挂载nfs目录到web下的/var/www/html
[root@ansible ~]# ansible web -m mount -a "src=nfs:/nfs path=/usr/share/nginx/html fstype=nfs state=mounted"
注释:
state 挂载状态
mounted 挂载
unmounted 卸载
在ansible上编写测试脚本,指定web主机执行。
[root@ansible ~]# ansible web -m script -a "/test.sh"
Copyright © 2023 leiyu.cn. All Rights Reserved. 磊宇云计算 版权所有 许可证编号:B1-20233142/B2-20230630 山东磊宇云计算有限公司 鲁ICP备2020045424号
磊宇云计算致力于以最 “绿色节能” 的方式,让每一位上云的客户成为全球绿色节能和降低碳排放的贡献者

