经过上面的配置,lnmp和nfs就搭建好了,下面将实现负载均衡及高可用功能。
web1已经配置过了配置文件和证书,这里直接复制过来。
1. [root@web2 ~]# rpm -ivh /media/nginx-rpm/* --nodeps --force 2. 3. [root@web2 ~]# cd /etc/nginx/conf.d/ 4. 5. [root@web2 conf.d]# rm -rf default.conf 6. 7. [root@web2 conf.d]# scp -rp root@192.168.1.7:/etc/nginx/conf.d/blog.conf . 8. 9. [root@web2 conf.d]# cd .. 10. 11. [root@web2 nginx]# scp -rp root@192.168.1.7:/etc/nginx/ssl_key /etc/nginx //复制证书 12. 13. [root@web2 nginx]# systemctl start nginx 14. 15. [root@web2 nginx]# mkdir /wordpress 16. 17. [root@web2 nginx]# mount -t nfs 192.168.1.11:/wordpress/ /wordpress //挂载论坛目录
1. [root@lb1 ~]# rpm -ivh /media/nginx-rpm/* --nodeps --force 2. [root@lb1 ~]# cd /etc/nginx/conf.d/ 3. [root@lb1 conf.d]# rm -rf default.conf 4. [root@lb1 conf.d]# vim lb.conf 5. upstream web { 6. server 192.168.1.7:443; 7. server 192.168.1.8:443; 8. } 9. server { 10. listen 443 ssl; 11. server_name blog.benet.com; 12. ssl_certificate ssl_key/server.crt; 13. ssl_certificate_key ssl_key/server.key; 14. location / { 15. proxy_pass https://web; 16. include nginx_params; 17. } 18. } 19. server { 20. listen 80; 21. server_name blog.benet.com; 22. return 302 https://$server_name$1; 23. } 24. [root@lb1 conf.d]# cd .. 25. [root@lb1 nginx]# vim nginx_params 26. proxy_set_header Host $http_host; 27. proxy_set_header X-Real-IP $remote_addr; 28. proxy_set_header X-Forwarded-For $proxy_add_x_forwarded_for; 29. proxy_connect_timeout 30; 30. proxy_send_timeout 60; 31. proxy_read_timeout 60; 32. proxy_buffering on; 33. proxy_buffer_size 32k; 34. proxy_buffers 4 128k; 35. [root@lb1 conf.d]# scp -rp root@192.168.1.7:/etc/nginx/ssl_key /etc/nginx/ //复制证书 36. [root@lb1 conf.d]# nginx -t 37. [root@lb1 conf.d]# systemctl restart nginx
2. 高可用配置
1. [root@lb1 ~]# yum -y install keepalived 2. [root@lb1 ~]# vim /etc/keepalived/keepalived.conf 3. global_defs { 4. router_id lb1 //修改路由名称 5. vrrp_strict //删除此行 6. } 7. vrrp_instance VI_1 { 8. state MASTER 9. interface ens33 //指定网卡信息 10. virtual_router_id 51 11. priority 100 12. advert_int 1 13. authentication { 14. auth_type PASS 15. auth_pass 1111 16. } 17. virtual_ipaddress { 18. 192.168.1.200 //指定漂移地址 19. } 20. } 21. [root@lb1 ~]# systemctl start keepalived
3. 查看漂移地址
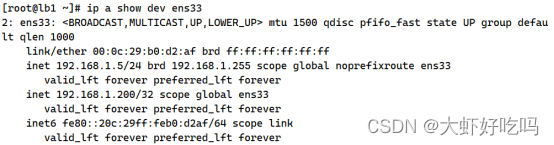
1. 负载均衡
1. [root@lb2 ~]# rpm -ivh /media/nginx-rpm/* --nodeps --force 2. 3. [root@lb2 ~]# scp -rp root@192.168.1.5:/etc/nginx/* /etc/nginx/ 4. 5. [root@lb2 ~]# cd /etc/nginx/conf.d/ 6. 7. [root@lb2 conf.d]# rm -rf default.conf 8. 9. [root@lb2 conf.d]# systemctl start nginx
2. 高可用
1. [root@lb2 ~]# yum -y install keepalived 2. [root@lb2 ~]# vim /etc/keepalived/keepalived.conf 3. global_defs { 4. router_id lb2 //修改路由名称 5. vrrp_strict //删除此行 6. } 7. vrrp_instance VI_1 { 8. state BACKUP //指定为备份主机 9. interface ens33 //指定网卡信息 10. virtual_router_id 51 11. priority 99 //指定优先级 12. advert_int 1 13. authentication { 14. auth_type PASS 15. auth_pass 1111 16. } 17. virtual_ipaddress { 18. 192.168.1.200 //指定漂移地址 19. } 20. } 21. [root@lb2 ~]# systemctl start keepalived
删掉之前配置的hosts文件,指定IP为漂移地址。
1. [root@client ~]# vim /etc/hosts 2. 192.168.1.200 blog.benet.com
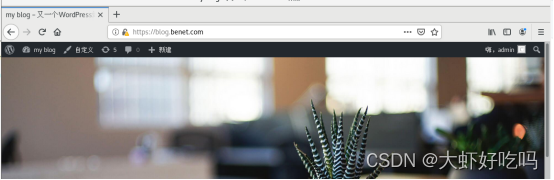
客户机访问blog.benet.com会自动转为https://blog.benet.com登录博客就成功了。
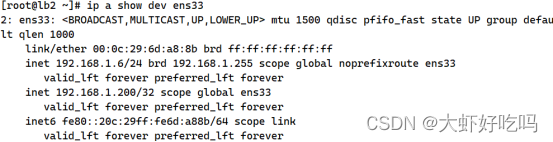
通过关闭lb1的keepalived,查看lb2主机的ip地址, 确认漂移地址转到lb2主机上。继续访问浏览器发现 可以正常访问。
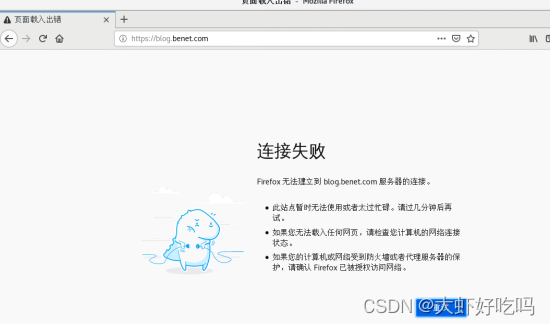
开启lb1的 keepalived服务器,关闭nginx服务并访问网页会发现无法访问网页的问题,下面将进行故障解决。
1. [root@lb1 ~]# systemctl start keepalived 2. 3. [root@lb1 ~]# systemctl stop nginx
1. [root@lb1 ~]# mkdir /sh 2. [root@lb1 ~]# vim /sh/check_nginx_proxy.sh 3. #!/bin/bash 4. killall -0 nginx 5. if [ $? -ne 0 ];then 6. systemctl stop keepalived 7. fi 8. [root@lb1 ~]# chmod +x /sh/check_nginx_proxy.sh 9. [root@lb1 ~]# vim /etc/keepalived/keepalived.conf //将脚本追踪模块添加到keepalived配置文件 10. vrrp_script check_nginx_proxy { 11. script "/sh/check_nginx_proxy.sh" 12. interval 2 13. weight 5 14. } 15. vrrp_instance VI_1 { //分别在此模块内和上方添加两个模块 16. state MASTER 17. interface ens33 18. virtual_router_id 51 19. priority 100 20. advert_int 1 21. authentication { 22. auth_type PASS 23. auth_pass 1111 24. } 25. virtual_ipaddress { 26. 192.168.1.200 27. } 28. track_script { 29. check_nginx_proxy 30. } 31. } 32. [root@lb1 ~]# systemctl restart keepalived
重启后验证关闭lb1主机的nginx服务,发现依旧可以访问论坛表明成功了。
[root@lb1 ~]# systemctl stop nginx

现lnmp的负载均衡及高可用功能均已实现,但客户机仍服务直接访问后放mysql及web等主机,通过客户机访问代理服务器转跳至目标主机。
分别连接web1、nfs主机,连接mysql数据库,客户端通过访问虚拟端口连接。
1. [root@lb1 ~]# vim /etc/nginx/nginx.conf 2. //在http字段上方添加 3. stream { 4. upstream web1 { 5. server 192.168.1.7:22; 6. } 7. upstream mysql { 8. server 192.168.1.9:3306; 9. } 10. upstream nfs { 11. server 192.168.1.11:22; 12. } 13. server { 14. listen 5555; 15. proxy_pass web1; 16. proxy_connect_timeout 30; 17. proxy_timeout 60; 18. } 19. server { 20. listen 7777; 21. proxy_pass mysql; 22. proxy_connect_timeout 30; 23. proxy_timeout 60; 24. } 25. server { 26. listen 9999; 27. proxy_pass nfs; 28. proxy_connect_timeout 30; 29. proxy_timeout 60; 30. } 31. } 32. [root@lb1 ~]# nginx -t 33. [root@lb1 ~]# systemctl restart nginx
把此文件复制到lb2主机上,实现负载均衡。
1. [root@lb2 ~]# scp -rp root@192.168.1.5:/etc/nginx/nginx.conf /etc/nginx/ 2. 3. [root@lb2 ~]# systemctl restart nginx
连接web1服务器测试成功。

连接nfs服务器测试成功 。

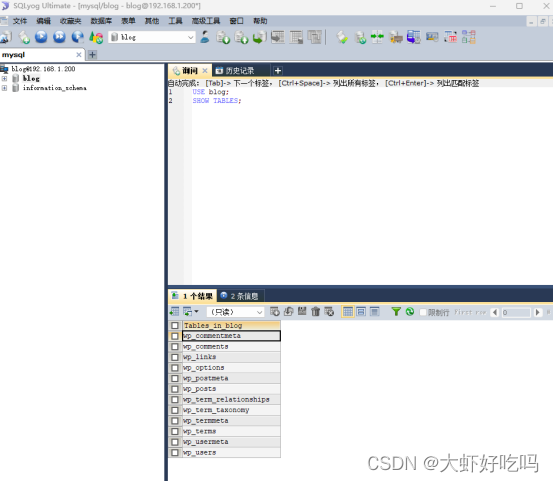
mysql服务器因为指定的3306端口,先需要使用win端软件连接直接登录mysql数据库。

通过SQLyog连接就可以看到数据库表中的内容了。
以上便是实验的全部过程,注意分清主机名称,思考含义。出现问题排除问题,检查问题,重点关注配置文件。
Copyright © 2023 leiyu.cn. All Rights Reserved. 磊宇云计算 版权所有 许可证编号:B1-20233142/B2-20230630 山东磊宇云计算有限公司 鲁ICP备2020045424号
磊宇云计算致力于以最 “绿色节能” 的方式,让每一位上云的客户成为全球绿色节能和降低碳排放的贡献者

