实验目标:搭建lnmp平台,安装wordpress论坛搭建nfs,客户端通过调度器访问nfs论坛。
实验拓扑图如下:
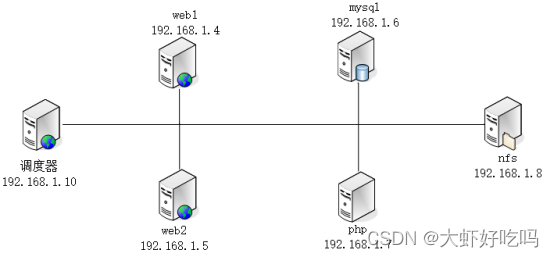
web1:192.168.1.4
web2:192.168.1.5
mysql:192.168.1.6
php:192.168.1.7
1.web1安装操作
1. [root@nginx1 ~]# rpm -ivh /media/nginx-rpm/* --nodeps --force 2. 3. [root@nginx1 ~]# systemctl start nginx 4. 5. [root@nginx1 ~]# systemctl enable nginx
2.web2安装操作
1. [root@nginx2 ~]# rpm -ivh /media/nginx-rpm/* --nodeps --force 2. 3. [root@nginx2 ~]# systemctl start nginx 4. 5. [root@nginx2 ~]# systemctl enable nginx
3.mysql安装操作
1. [root@mysql ~]# rpm -ivh /media/mysql5.6-rpm/* --nodeps --force 2. 3. [root@mysql ~]# systemctl start mysqld 4. 5. [root@mysql ~]# systemctl enable mysqld 6. 7. [root@mysql ~]# mysqladmin -uroot password 8. 9. New password: //输入新密码 10. 11. Confirm new password: //输入新密码
4.php安装操作
1. [root@php ~]# rpm -ivh /media/php-rpm/* --nodeps --force 2. 3. [root@php ~]# systemctl start php-fpm 4. 5. [root@php ~]# systemctl enable php-fpm
1.安装论坛
1. [root@nginx1 ~]# cp -rp /media/wordpress-4.9.4-zh_CN.zip / 2. 3. [root@nginx1 ~]# cd / 4. 5. [root@nginx1 /]# unzip wordpress-4.9.4-zh_CN.zip 6. 7. [root@nginx1 /]# chmod -R 777 wordpress
2.nginx1编辑配置文件
1. [root@nginx1 ~]# cd /etc/nginx/conf.d/ 2. 3. [root@nginx1 conf.d]# rm -rf default.conf //删除默认文件 4. 5. [root@nginx1 conf.d]# vim blog.conf 6. 7. server { 8. 9. listen 80; 10. 11. server_name www.blog.com; 12. 13. root /wordpress; 14. 15. index index.php index.html; 16. 17. 18. 19. location ~ \.php$ { 20. 21. root /wordpress; 22. 23. fastcgi_pass 192.168.1.7:9000; //指定新的PHP主机IP 24. 25. fastcgi_index index.php; 26. 27. fastcgi_param SCRIPT_FILENAME $document_root$fastcgi_script_name; 28. 29. include fastcgi_params; 30. 31. } 32. 33. } 34. 35. [root@nginx1 conf.d]# systemctl restart nginx 36. 37. [root@nginx1 conf.d]# scp -rp blog.conf root@192.168.1.5:/etc/nginx/conf.d/
3.nginx2配置
1. [root@nginx2 ~]# rm -rf /etc/nginx/conf.d/default.conf //删除默认配置文件 2. 3. [root@nginx2 ~]# systemctl restart nginx 4. 5. [root@nginx2 ~]# scp -rp root@192.168.1.4:/wordpress /
创建数据库并创建用户。
1. [root@mysql ~]# mysql -uroot -p123 2. 3. //省略部分内容 4. 5. mysql> create database blog; 6. 7. Query OK, 1 row affected (0.00 sec) 8. 9. 10. 11. mysql> grant all on blog.* to lisi@'%' identified by '123456'; 12. 13. Query OK, 0 rows affected (0.00 sec)
1. [root@php ~]# vim /etc/php-fpm.d/www.conf //修改下面两行 2. 3. listen = 192.168.1.7:9000 //监听php主机 4. 5. listen.allowed_clients = 192.168.1.4,192.168.1.5 //允许监听的主机 6. 7. [root@php ~]# systemctl restart php-fpm 8. 9. [root@php ~]# scp -rp root@192.168.1.4:/wordpress / //复制nginx1安装的论坛到PHP根目录下
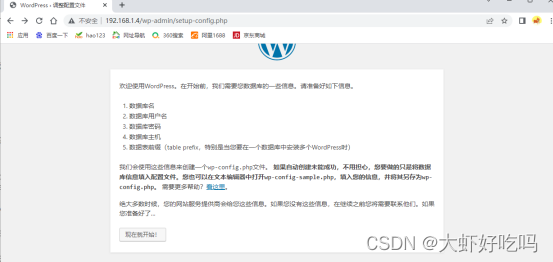
现在访问192.168.1.4或者192.168.1.5应都可以看到下面的安装页面,点击现在就开始!。
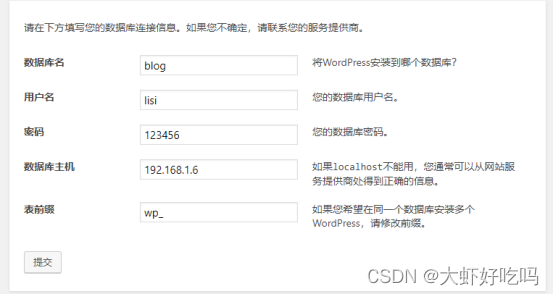
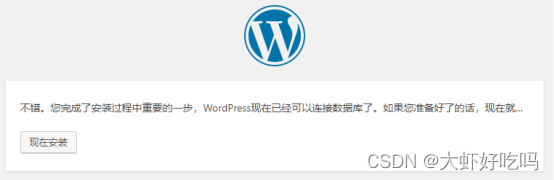
输入数据库信息点击提交,完成后点击现在安装。
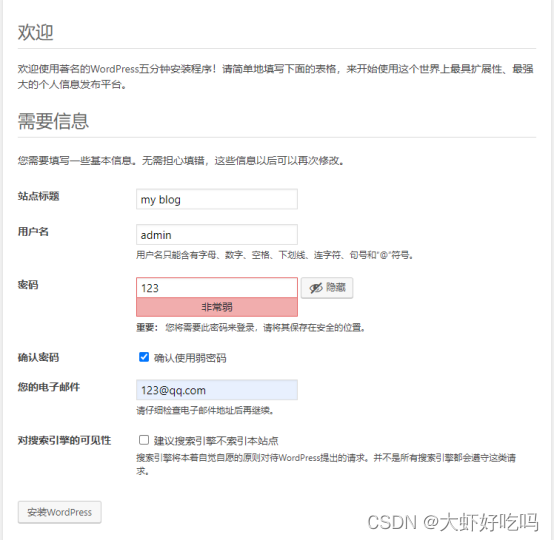
添加站点信息,管理员用户密码,邮箱等。
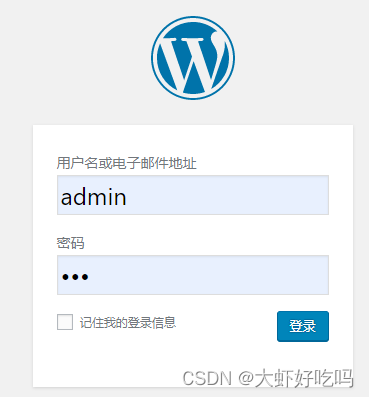
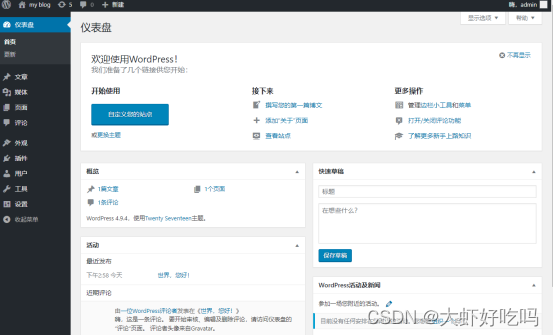
下面登录刚创建好的admin用户,就可以看到论坛首页,这样用户可以根据需求添加修改自己的论坛了。
1.nfs安装操作
1. [root@nfs ~]# yum -y install nfs-utils rpcbind 2. 3. [root@nfs ~]# systemctl start nfs rpcbind 4. 5. [root@nfs ~]# systemctl enable nfs rpcbind
2.调度器安装操作
1. [root@nginx_lb ~]# rpm -ivh /media/nginx-rpm/* --nodeps --force 2. 3. [root@nginx_lb ~]# systemctl start nginx 4. 5. [root@nginx_lb ~]# systemctl enable nginx
1.nfs服务器
1. [root@nfs ~]# mkdir -p /nfs/blog //创建挂载点 2. 3. [root@nfs ~]# vim /etc/exports //发布共享目录 4. 5. /nfs/blog 192.168.1.0/24(rw,sync,no_root_squash) 6. 7. [root@nfs ~]# systemctl restart nfs rpcbind //重启服务
2.nginx服务器验证
1. [root@nginx1 ~]# showmount -e 192.168.1.8 2. 3. Export list for 192.168.1.8: 4. 5. /nfs/blog 192.168.1.0/24
3.挂载nfs服务器盘
(1)nginx1挂载
1. [root@nginx1 ~]# cd /wordpress/ 2. 3. [root@nginx1 wordpress]# scp -rp wp-content/* root@192.168.1.8:/nfs/blog/ //把网站首页复制到nfs服务器中 4. 5. [root@nginx1 wordpress]# mount -t nfs 192.168.1.8:/nfs/blog wp-content //挂载nfs服务器
(2)nginx2挂载
1. [root@nginx2 ~]# cd /wordpress/ 2. 3. [root@nginx2 wordpress]# mount -t nfs 192.168.1.8:/nfs/blog wp-content
(3)php挂载
1. [root@php ~]# cd /wordpress/ 2. 3. [root@php wordpress]# mount -t nfs 192.168.1.8:/nfs/blog wp-content
1. [root@nginx_lb ~]# cd /etc/nginx/conf.d/ 2. 3. [root@nginx_lb conf.d]# rm -rf default.conf 4. 5. [root@nginx_lb conf.d]# vim lb.conf 6. 7. upstream webcluster { 8. 9. server 192.168.1.4:80; 10. 11. server 192.168.1.8:80; 12. 13. } 14. 15. server { 16. 17. listen 80; 18. 19. server_name www.blog.com; 20. 21. 22. location / { 23. 24. proxy_pass http://webcluster; 25. 26. proxy_set_header Host $http_host; 27. 28. proxy_set_header X-Real-IP $remote_addr; 29. 30. proxy_set_header X-Forwarded-For $proxy_add_x_forwarded_for; 31. 32. } 33. 34. } 35. 36. [root@nginx_lb conf.d]# systemctl restart nginx
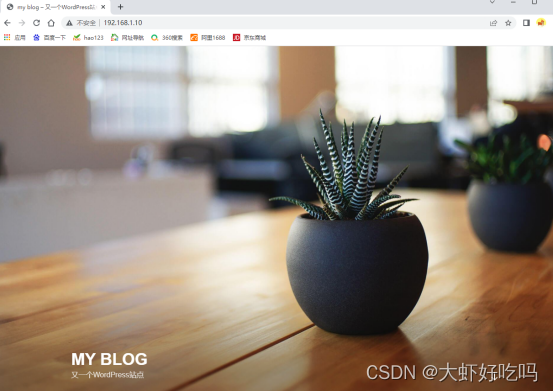
浏览器访问192.168.1.10,此时已经可以看到论坛页面了。
使用nginx1和nginx2分别动态查看nginx访问日志。
[root@nginx1 ~]# tail -f /var/log/nginx/access.log

[root@nginx2 ~]# tail -f /var/log/nginx/access.log

Copyright © 2023 leiyu.cn. All Rights Reserved. 磊宇云计算 版权所有 许可证编号:B1-20233142/B2-20230630 山东磊宇云计算有限公司 鲁ICP备2020045424号
磊宇云计算致力于以最 “绿色节能” 的方式,让每一位上云的客户成为全球绿色节能和降低碳排放的贡献者

