在Android应用开发过程中,固定的一些控件和属性可能满足不了开发的需求,所以在一些特殊情况下,我们需要自定义控件与属性。
onDraw()主要是为viewGroup类型布局子视图用的,在View中这个函数为空函数。
onMeasure()
用于计算视图大小(即长和宽)的方式,并通过setMeasuredDimension(width, height)保存计算结果。
onTouchEvent
定义触屏事件来响应用户操作。
还有一些不常用的方法:
onKeyDown() 当按下某个键盘时
onKeyUp() 当松开某个键盘时
onTrackballEvent() 当发生轨迹球事件时
onSizeChange() 当该组件的大小被改变时
onFinishInflate() 回调方法,当应用从XML加载该组件并用它构建界面之后调用的方法
onWindowFocusChanged(boolean) 当该组件得到、失去焦点时
onAttachedToWindow() 当把该组件放入到某个窗口时
onDetachedFromWindow() 当把该组件从某个窗口上分离时触发的方法
onWindowVisibilityChanged(int) 当包含该组件的窗口的可见性发生改变时触发的方法
View的绘制流程
绘制流程函数调用关系如下图:
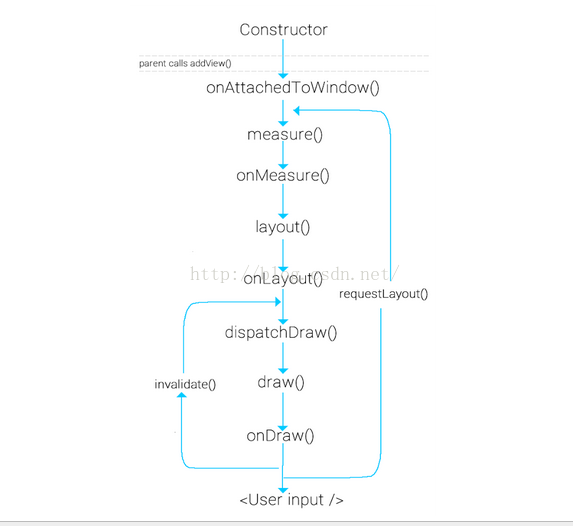
我们调用requestLayout()的时候,会触发measure 和 layout 过程,调用invalidate,会执行 draw 过程。
1. 继承已有的控件
当要实现的控件和已有的控件在很多方面比较类似, 通过对已有控件的扩展来满足要求。
2. 继承一个布局文件
一般用于自定义组合控件,在构造函数中通过inflater和addView()方法加载自定义控件的布局文件形成图形界面(不需要onDraw方法)。
3.继承view
通过onDraw方法来绘制出组件界面。
1.在布局文件中直接加入属性,在构造函数中去获得。
布局文件:
<RelativeLayout xmlns:android="http://schemas.android.com/apk/res/android" android:layout_width="match_parent" android:layout_height="match_parent" > <com.example.demo.myView android:layout_width="wrap_content" android:layout_height="wrap_content" Text="@string/hello_world" />
获取属性值:
public myView(Context context, AttributeSet attrs) { super(context, attrs); // TODO Auto-generated constructor stub int textId = attrs.getAttributeResourceValue(null, "Text", 0); String text = context.getResources().getText(textId).toString(); }
2.在res/values/ 下建立一个attrs.xml 来声明自定义view的属性。
可以定义的属性有:
//参考某一资源ID (name可以随便命名) //颜色值 //布尔值 //尺寸值 //浮点值 //整型值 //字符串 //百分数 //枚举值 //位或运算 //多类型
attrs.xml进行属性声明
添加到布局文件
<RelativeLayout xmlns:android="http://schemas.android.com/apk/res/android" android:layout_width="match_parent" android:layout_height="match_parent" xmlns:myview="http://schemas.android.com/apk/com.example.demo" > <com.example.demo.myView android:layout_width="wrap_content" android:layout_height="wrap_content" myview:text = "test" myview:textColor ="#ff0000" />
这里注意命名空间:
xmlns:前缀=”http://schemas.android.com/apk/res/包名(或res-auto)”,
前缀:TextColor 使用属性。
public myView(Context context, AttributeSet attrs) { super(context, attrs); // TODO Auto-generated constructor stub TypedArray a = context.obtainStyledAttributes(attrs, R.styleable.myView); String text = a.getString(R.styleable.myView_text); int textColor = a.getColor(R.styleable.myView_textColor, Color.WHITE); a.recycle(); }
或者:
public myView(Context context, AttributeSet attrs) { super(context, attrs); // TODO Auto-generated constructor stub TypedArray a = context.obtainStyledAttributes(attrs, R.styleable.myView); int n = a.getIndexCount(); for(int i=0;i<n;i++){ int attr = a.getIndex(i); switch (attr) { case R.styleable.myView_text: break; case R.styleable.myView_textColor: break; } } a.recycle(); }
实现上面的效果我们大致需要分成这几步
在res/values/ 下建立一个attrs.xml 来声明自定义view的属性
一个继承View并复写部分函数的自定义view的类
一个展示自定义view 的容器界面
1.自定义view命名为myView,它有一个属性值,格式为color:
2.在构造函数获取获得view的属性配置和复写onDraw和onTouchEvent函数实现绘制界面和用户事件响应。
public class myView extends View{ //定义画笔和初始位置 Paint p = new Paint(); public float currentX = 50; public float currentY = 50; public int textColor; public myView(Context context, AttributeSet attrs) { super(context, attrs); //获取资源文件里面的属性,由于这里只有一个属性值,不用遍历数组,直接通过R文件拿出color值 //把属性放在资源文件里,方便设置和复用 TypedArray array = context.obtainStyledAttributes(attrs,R.styleable.myView); textColor = array.getColor(R.styleable.myView_TextColor,Color.BLACK); array.recycle(); } @Override protected void onDraw(Canvas canvas) { super.onDraw(canvas); //画一个蓝色的圆形 p.setColor(Color.BLUE); canvas.drawCircle(currentX,currentY,30,p); //设置文字和颜色,这里的颜色是资源文件values里面的值 p.setColor(textColor); canvas.drawText("BY finch",currentX-30,currentY+50,p); } @Override public boolean onTouchEvent(MotionEvent event) { currentX = event.getX(); currentY = event.getY(); invalidate();//重新绘制图形 return true; } }
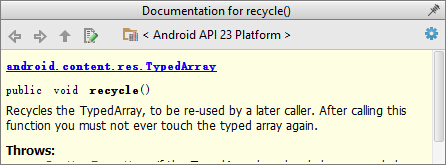
这里通过不断的更新当前位置坐标和重新绘制图形实现效果,要注意的是使用TypedArray后一定要记得recycle(). 否则会对下次调用产生影响。
3.把myView加入到activity_main.xml布局里面
<RelativeLayout xmlns:android="http://schemas.android.com/apk/res/android" xmlns:tools="http://schemas.android.com/tools" android:layout_width="match_parent" android:layout_height="match_parent" xmlns:myview="http://schemas.android.com/apk/res-auto" android:paddingBottom="@dimen/activity_vertical_margin" android:paddingLeft="@dimen/activity_horizontal_margin" android:paddingRight="@dimen/activity_horizontal_margin" android:paddingTop="@dimen/activity_vertical_margin" tools:context="finch.scu.cn.myview.MainActivity"> <finch.scu.cn.myview.myView android:layout_width="match_parent" android:layout_height="match_parent" myview:TextColor="#ff0000" />
4.最后是MainActivity
public class MainActivity extends AppCompatActivity { @Override protected void onCreate(Bundle savedInstanceState) { super.onCreate(savedInstanceState); setContentView(R.layout.activity_main); } }
具体的view要根据具体的需求来,比如我们要侧滑删除的listview我们可以继承listview,监听侧滑事件,显示删除按钮实现功能。
欢迎start,欢迎评论,欢迎指正
Copyright © 2023 leiyu.cn. All Rights Reserved. 磊宇云计算 版权所有 许可证编号:B1-20233142/B2-20230630 山东磊宇云计算有限公司 鲁ICP备2020045424号
磊宇云计算致力于以最 “绿色节能” 的方式,让每一位上云的客户成为全球绿色节能和降低碳排放的贡献者

